Start editing
This page introduces the everyday authoring cycle after installation. It shows how to record a proposed change in an issue, edit and check the document, and bring the change into GitLab or GitHub through a review. It also shows how to confirm that the published result is current and the issue is closed. Commands are explained for authors who are new to Git or the terminal.
Follow the everyday cycle
-
Record the task
Raise an issue describing the change and what a finished result must include. Create a branch for that issue before editing.
-
Edit the source
Update the Markdown file in Visual Studio Code and review the changed lines.
-
Preview the website
Open the project environment and use
zensical servewhile editing Markdown. -
Build and check the documents
Generate the PDF and any source bundle locally. Check them before publishing.
-
Review, save, and propose the change
Use the pre-commit checklist, then commit a labelled snapshot on your issue branch and push it through SSH to GitLab or GitHub. Open a merge or pull request into the protected
mainbranch, linking it to the issue. -
Confirm closure and publication
After the merge, check that the issue closed, wait for the automated build to pass, then open the published website and PDF.
The example below follows one issue from the first description through its Markdown edit, diagram, review, and merge.
Start with an issue and edit the source
An issue records the work before the first edit, so the branch and review have a clear purpose. For example, suppose you need to write a System context section and draw a system context diagram.
Check that main is protected
The project maintainer may already have set this up during installation.
Before using the issue-and-branch workflow, check the existing rules; do not
create a second rule or change project settings just because you cannot see
them. A branch named main is not necessarily protected.
- In the repository, open Settings > Rules > Rulesets. Look for
an active rule targeting
main. Some repositories use the older Settings > Branches > Branch protection rules instead. - Check that changes must arrive through a pull request, the expected build/status checks must pass before merge, and force pushes are not allowed. If your course requires approval, check that the rule requires it rather than relying on a reviewer being invited.
- Open Settings > Repository > Branch rules and inspect the
rule for
main. Confirm that direct push and merge access is restricted, force push is off, and the right people can merge requests. - Open Settings > Merge requests. Check whether Pipelines must succeed is enabled under merge checks and whether your project has any required approvals. A required-pipeline rule also needs a pipeline configured to run for merge requests; otherwise a request may be blocked because it has no pipeline at all.
Check that the project has a CI configuration (.github/workflows/ or
.gitlab-ci.yml) and that a recent run passed; the presence of a file alone
does not show that checks are working. If you cannot see the settings, ask a
maintainer to confirm them. If a required guardrail is missing, ask the
maintainer to put it in place before you rely on the workflow. Recheck after
repository-setting changes and before later merges; protection and passing CI
need to persist, not just exist on the day the project was created.
Raise the issue and create a branch
Open your project in a browser and start a new issue:
Select Issues > New issue.
Select Plan > Work items > New item, then choose Issue. If your GitLab version shows Issues directly, use its New issue button instead.
-
Give the issue a specific title, such as Write the system context section and diagram. In the description, record what a reviewer should be able to check:
- Explain the system boundary, its users, and the external systems it interacts with in the relevant Markdown chapter.
- Draw a system context diagram whose labels agree with the text. Keep the editable drawing source as well as the exported image.
- Add the diagram to the chapter with useful alternative text and a caption; check it in both the website and PDF.
-
Create the issue and note its number. This example uses
#12; use the number your project gives you. Before editing, create a branch frommainnamed after the issue, such as12-system-context. In Visual Studio Code, click the active branch name in the bottom-left status bar and select Create new branch.... If the branch name is missing, follow the branch-name recovery note under Save and push your updates. The command-line route is available too.
Keep the issue open while you work. The merge request or pull request will
close it when the finished change reaches main.
Edit and review the Markdown file in Visual Studio Code
- Open the project's folder with File > Open Folder.... In the
Explorer sidebar, expand
docs/and select the.mdfile containing the chapter. If the section needs its own new page, create the Markdown file underdocs/and add it to the project's navigation inzensical.toml. - In the editor, add a System context heading at the right level and
write a short explanation of what is inside the system boundary, who uses
the system, and which outside systems connect to it. Draw the diagram in
your project's chosen tool. Save its editable source in the project, export
an image under
docs/, and insert it in the Markdown with descriptive alternative text and a caption as shown in the next section. - Save the Markdown with
Ctrl+Son Windows/Linux orCmd+Son macOS. To see the file as ordinary Markdown beside its source, pressCtrl+K Von Windows/Linux orCmd+K Von macOS. This built-in preview is useful for prose and basic formatting, but it does not reproduce all of Zensical's captions, numbering, or site styling; check those in the browser preview in the next section. - Click the Source Control icon and select the Markdown file under Changes. The side-by-side diff shows the earlier version beside your edits. Review the diagram source and exported image there as well, and make sure unrelated files are not part of the change.
Insert an image with a caption
Keep the drawing you can edit and the image you publish as separate files. For
this example, save system-context-example.pptx or
system-context-example.drawio under tools/documentation-diagrams/, then
export docs/images/system-context-example.png. The example below uses the
editable tools/documentation-diagrams/system-context-example.drawio source
in this guide. The .png is what the website and PDF display; the source file
lets you revise it later. If your project uses different folders, adjust the
paths consistently.
- Save the editable presentation as
tools/documentation-diagrams/system-context-example.pptx. Put the whole diagram on one slide using shapes, text, and connectors. - Select only the diagram objects (
Ctrl-click on Windows orCommand-click on macOS). On Shape Format, choose Group > Group, so the exported image includes all the labels and arrows but not the empty slide around them. - Right-click the group (Control-click on macOS), choose Save as
Picture, select PNG, and save it as
docs/images/system-context-example.png. - Open the exported PNG. Check that nothing is cut off, there is little empty space, and the smallest labels are readable at the size you intend to use in the document. If it looks blurry, enlarge the drawing before exporting again; do not stretch a small PNG in Markdown.
- In the downloadable draw.io application, save the editable diagram as
tools/documentation-diagrams/system-context-example.drawio. - Choose File > Export As > PNG. Set Zoom to
200%for readable text. Set Size to the diagram bounds, rather than a whole mostly empty page, and use a small Border Width such as20. Leave Grid off; use a light background so text remains legible in both website colour schemes and the PDF. - Click Export and save the PNG as
docs/images/system-context-example.png. Open it and check the crop, labels, arrows, and text size before inserting it.
In a Markdown file such as docs/system-context.md, the path to that PNG is
images/system-context-example.png, relative to the Markdown file. Add a
sentence that refers to the figure, then put the figure-caption block
immediately after the image:
The portal's external interactions are shown in \ref{figure-system-context-example}.
{ width="90%" }
/// figure-caption
attrs: {id: figure-system-context-example}
System context of the document portal
///
The alternative text explains the image to a reader who cannot see it. The
stable id makes the \ref{...} work even if earlier figures are added or
removed. The width limits the displayed size; it cannot restore detail to
an undersized export. Here is the example as it should render:
The portal's external interactions are shown in Figure 4.1.
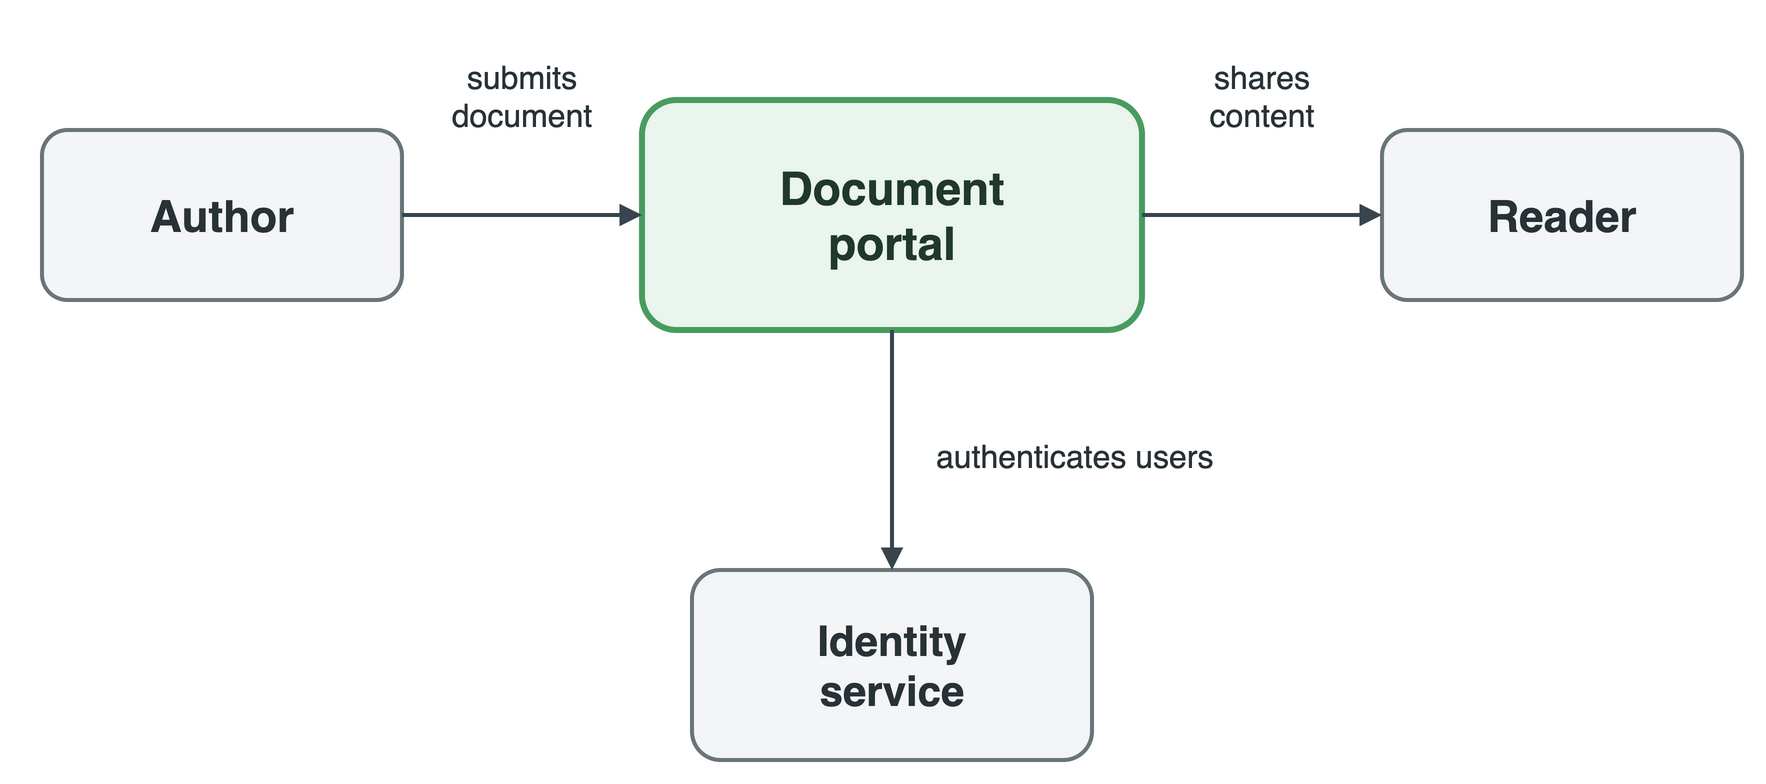
1. System context of the document portal
Open this page with zensical serve and check the image, numbered caption,
and reference in the website. Then build the PDF as described under
Build and check the downloadable documents and check that
the same image fits, its smallest labels remain readable, and the caption and
reference have the expected number. Visual Studio Code's built-in Markdown
preview does not verify the final caption rendering. For more options, see
Add a caption,
Caption a figure, and the
drawing-tool guidance.
Before committing, open Source Control in Visual Studio
Code. Make sure the changed Markdown file, the exported PNG, and its editable
.pptx or .drawio source are all included on your issue branch; do not
commit only the image and leave the drawing behind.
Preview the website locally
Preview a website locally with Zensical while you write, without needing to push anything. This lets you check headings, links, images, diagrams, and PDF-only/web-only content before anyone else sees them.
Open a terminal
A terminal (also called a command line, console, or shell) is a text-based way to give your computer instructions by typing commands, instead of clicking buttons. It can look intimidating at first, but this whole workflow only needs a handful of commands, and they're all given below.
The easiest way to open one is Visual Studio Code's own integrated terminal:
- Open your project folder in Visual Studio Code, if it isn't already open (File > Open Folder...).
- Open the integrated terminal, whichever way is quickest for you:
- Menu: View > Terminal.
- Keyboard shortcut:
Ctrl+`on Windows/Linux,Cmd+`on macOS. - Command Palette (
Ctrl+Shift+P/Cmd+Shift+P) > View: Toggle Terminal.
- A panel opens at the bottom of the window, already sitting in your project folder - defaulting to PowerShell on Windows, or your shell of choice (bash/zsh) on macOS and Linux.
This integrated terminal also activates your project virtual environment
automatically (a self-contained folder holding this project's Python packages),
as long as you selected its .venv interpreter once. Follow the
Getting started
to create the environment, and check that every new terminal prompt begins
with (.venv) before running a Python, Zensical, or prodockit command.
If you'd rather use your system's own terminal application instead of Visual Studio Code's, you need to navigate to your project folder and activate the virtual environment yourself:
- Open a terminal application: press
Cmd+Spaceto open Spotlight, typeTerminal, and pressEnter. -
Navigate to your project folder using the
cd(change directory) command - replace the path below with wherever you cloned your project: -
Activate the virtual environment:
Your prompt now starts with
(.venv), confirming it's active.
- Open PowerShell: press the
Windowskey, typePowerShell, and pressEnter. -
Navigate to your project folder using the
cdcommand: -
Activate the virtual environment:
Your prompt now starts with
(.venv), confirming it's active.
- Open a terminal application: look for Terminal in your applications menu.
-
Navigate to your project folder using the
cd(change directory) command - replace the path below with wherever you cloned your project: -
Activate the virtual environment:
Your prompt now starts with
(.venv), confirming it's active.
After activation, python --version must report Python 3.14. If you use
Conda, Poetry, uv, or a differently named environment, substitute its
activation and package commands throughout the guide and verify it selects
Python 3.14 before continuing.
Start the preview server
-
In your terminal (with the virtual environment active), start the local preview server:
-
Wait for it to finish starting - you'll see some log messages ending with a local web address.
- Open that address (typically http://127.0.0.1:8000) in your browser to view your documentation.
Leave zensical serve running in its terminal while you write - it watches your files and automatically rebuilds and refreshes the browser whenever you save a change, so you don't need to restart it after every edit. To stop it, click back into its terminal and press Ctrl+C.
Tip
zensical serve only builds the website - it does not update
docs/site_documentation.pdf. Build and check the downloadable documents
separately before publishing.
Build and check the downloadable documents
Build downloadable documents separately because zensical serve
updates the website preview but does not regenerate the PDF or
source bundle. If your local environment can build them, do so before
committing a change that should appear in them. Otherwise, follow the
pre-commit checklist and check the PDF after the
merge.
- Confirm that the terminal is in the project directory and its virtual environment is active.
-
Make a clean website build, then build the report from it:
-
If the project provides a Source download, build that document too:
-
Open
docs/site_documentation.pdfand, when created,docs/source_bundle.pdf. Check page breaks, figures, tables, references, diagrams, mathematics, and the index rather than relying only on the website preview.
The front-page download buttons already point to these files. They are generated locally and excluded from Git, so a fresh clone does not contain them and a normal commit does not upload them. Refresh the local website after building to test its download buttons.
What the source bundle contains
prodockit source-bundle includes the root README.md, the Markdown files
under the configured documentation directory, and the active Zensical
configuration. It does not include the whole repository or generated root files
such as CHANGELOG.md, CONTRIBUTING.md, and LICENSE.md. See
Source-code bundling if the submission
requires something different.
Run these commands again whenever the downloadable documents need to reflect new edits. The automated build repeats them after a change reaches the default branch.
Review your work before committing
Use this checklist after editing and building, but before you stage and commit the change. Check the result against the issue's description and acceptance criteria, not just the files you intended to edit.
- The issue describes this work, and your active branch is the issue branch,
not
main. - All edited files are saved. Review each changed file and its diff; remove accidental edits, generated files, temporary files, and credentials.
- Every changed page looks right in the local website preview. Check its
navigation entry, new links, captions, figure and table numbers, useful
image alternative text, and references. A
?or??in place of a reference usually means an id is missing or mistyped. - For diagrams, compare labels and connections with the surrounding text. Include both the exported image and its editable drawing source.
- The clean website build passed. If your project provides a Source download, rebuild and test it after the final edit.
- If a local PDF build is available, rebuild and open the PDF. Check the changed content, page breaks, wide tables, fonts, diagrams, mathematics, and page references; if affected, also check the word count and index. Test the PDF download button locally.
- Check the list of files you are about to stage. It should contain only the files needed for this issue; review the staged diff before committing.
The website and PDF use different layout engines, so a correct website preview does not prove the PDF is correct. If a check fails, fix it and repeat the affected checks before committing. Save and push your updates once the checklist is complete.
When you cannot build the PDF locally
Complete the other checks and continue with the commit and review. Mark PDF layout as a check still to do. After the branch is merged and the automated build succeeds, open the published PDF and inspect the changed pages. If the layout is wrong or the PDF is missing, raise a follow-up issue and fix it on a new branch.
Local checks are preparation, not a substitute for course checkpoints or instructor-controlled clean-setup/build validation. Follow any scheduled validation instructions and retain the required evidence.
Recheck after maintenance
After updating prodockit, another dependency, or files from
prodockit-template, rebuild both outputs and repeat this checklist. A
maintenance update can change generated output even when none of the
document's Markdown files changed.
Save and push your updates
Save and push changes you want to keep. Stay on the
branch you created for the issue. If you have not made one yet,
create it before committing because main is protected. Then
commit it (record a labelled snapshot in the project's history)
and push the branch (upload it with push to GitLab or GitHub).
You can use Visual Studio Code's Source Control view or type Git commands
directly. If you've already edited files on main, creating a branch carries
your uncommitted edits with you.
- Make sure you've saved your changed files (a filled circle next to a file name in the Explorer tab means it has unsaved changes - select the file and press
Ctrl+S/Cmd+S). -
Check the branch name in the bottom-left of the status bar. If it says
main, click it, select Create new branch..., and enter a name that identifies your issue, such as12-system-context. Visual Studio Code switches to that branch, taking your uncommitted edits with it. If you are already on the issue branch, keep using it.Restoring a missing active branch name
If no branch name appears, right-click the status bar and turn on Source Control Checkout.
If it still does not appear, open the integrated terminal (View > Terminal) and run
git branch --show-current. If the result ismain, use the Command Palette (Ctrl+Shift+P/Cmd+Shift+P) to run Git: Create Branch.... If Git says this is not a repository, open the cloned project folder with File > Open Folder..., then try again. -
Click the Source Control icon in the left-hand sidebar. You'll see a list of every changed and new file. Select each file to review its diff, then stage only the files for this issue with the Stage Changes control. For the example, include the Markdown chapter, exported diagram, and editable drawing source.
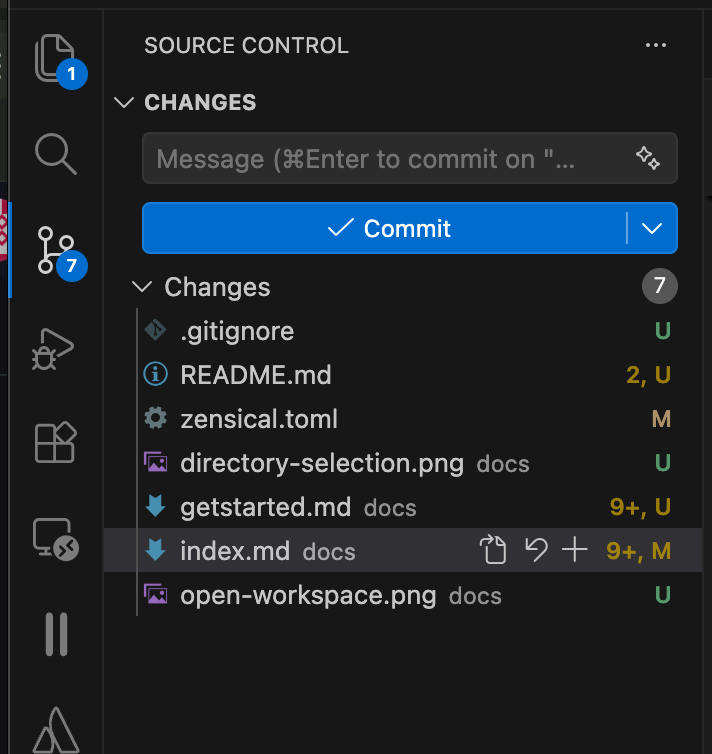
2. Initial commit
-
Type a short, descriptive message in the message box (for example, "Write system context section and diagram") - this is the label future-you (or a marker) will see when looking back through the history.
-
Press Commit to record the staged files on your branch. This records the snapshot on your computer only - you haven't sent anything anywhere yet.
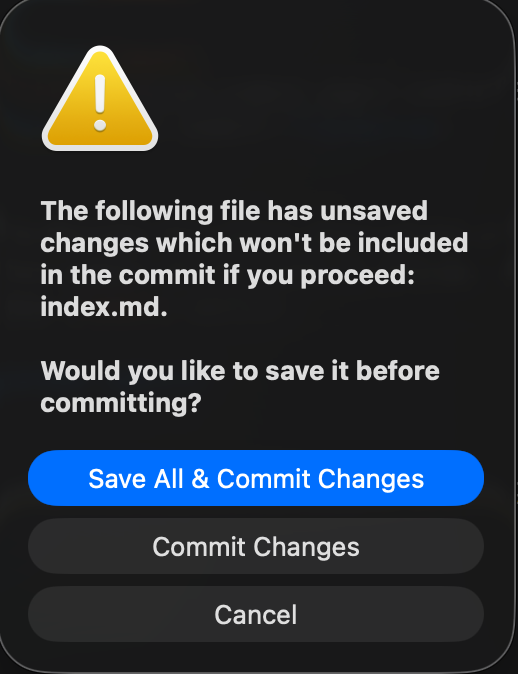
3. Commit changes
-
Press Publish Branch to push a new branch to GitLab or GitHub. For later commits on the same branch, use Sync Changes. If Sync Changes reports that it cannot find the remote branch, follow the missing-branch recovery.
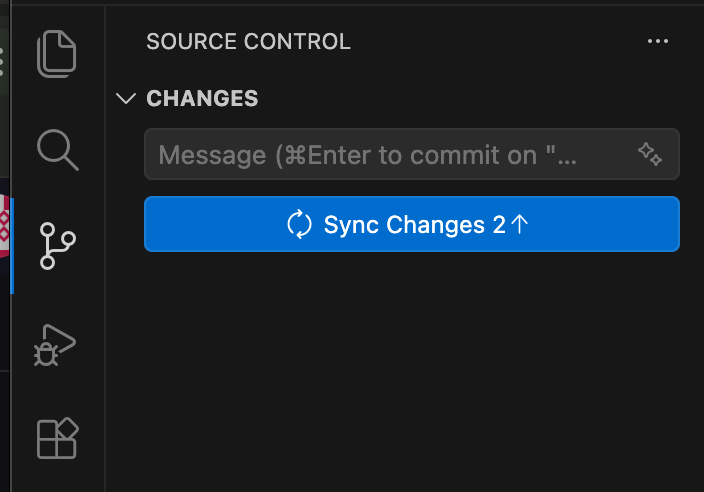
4. Sync changes
-
Check your current branch and what's changed:
-
If you are on
main, create and switch to a branch named for the issue before committing. Any uncommitted edits come with you:If you are already on a change branch, stay on it.
-
Stage the files for this issue - "staging" means marking them so Git includes them in the next commit. Use the paths shown by
git status; for example, stage the changed Markdown file, exported image, and editable drawing source, but leave unrelated files out:git add docs/section1.md git add docs/images/system-context.png git add tools/documentation-diagrams/system-context.drawio git statusReplace those example paths with the locations used by your project.
-
Commit the staged changes with a short, descriptive message:
This records the snapshot on your computer only - you haven't sent anything anywhere yet.
-
Push the new branch to your GitLab or GitHub remote, telling Git to track it there:
Substitute your branch name if it differs. For later commits on the same branch, a plain
git pushis enough.
Pushing a branch does not publish the website or close its issue. Open a merge
request on GitLab or a pull request on GitHub from your branch into main,
include Closes #12 in its description (using your actual issue number), wait
for the checks, and merge it when approved. The protected main branch cannot
be pushed to directly. See Merging your branch back
for the review steps.
Note
Commit little and often. Small, clearly described commits are easier to review, easier to revert if something goes wrong, and give you a much more useful history to look back on than one huge commit at the deadline.
If you committed and tried to push from main
If the push was rejected because main is protected, your commit is still on
your computer. You do not need to undo it or commit the files again. Create a
branch from the current commit, then push that branch instead. Do not force-push
main.
- Check that the active branch is still
main. Click its name in the status bar and select Create new branch.... Enter a name such as12-system-context. The new branch includes the commit you already made. - Open Source Control and select Publish Branch to push the new
branch. Then open a merge request on GitLab or a pull request on GitHub
to bring it into
main.
Your local main may still point to the commit; that is expected. Continue
working on the new branch, and do not try to push main again.
If the push to main succeeded, the commit is already on the remote
main branch. Do not make a second branch just to push the same commit. Check
with your repository maintainer, because the expected branch protection may
not be enabled.
If Sync Changes cannot find the branch on origin
If Visual Studio Code reports fatal: couldn't find remote ref after running
git pull --tags origin <branch-name>, it tried to pull a branch that does not
yet exist on the remote. Your local commit is still safe. The accompanying
rpc error: code = Canceled can follow that failed pull; do not repeatedly
select Sync Changes or force-push.
-
In Visual Studio Code, open View > Terminal and check the active branch and remote:
Confirm that you are on your issue branch, not
main, and thatoriginpoints to your intended GitLab or GitHub project. If either is wrong, stop and ask your maintainer before pushing. -
Publish the branch using Publish Branch in the Source Control view. If Visual Studio Code only offers Sync Changes, push from the terminal instead. For example, if your active branch is
template-update-8c6cf8410, run:Replace the example name with the branch shown by
git branch --show-current. This creates the remote branch and sets it as the upstream for later syncs. If the push fails, keep the error message and ask your maintainer; do not force-push.
Review and merge the issue branch
The issue created at the start describes the intended result. Keep its branch
and review connected to that issue until the change reaches protected main.
Working with branches
A branch is a parallel, isolated line of work that keeps main (and therefore
the published website and PDF) stable while you edit. Follow
Save and push your updates to create and publish
one if you did not create it from the issue before editing.
Creating the branch from the issue in GitLab or GitHub is another option: GitLab offers Create branch on an issue, while GitHub offers it under Development. Check out that branch locally before editing. Whatever method you use, put the closing reference in the merge/pull request description so reviewers can see the issue and its acceptance checklist.
Merging your branch back
Once you're happy with the branch, use the hosting service to merge it into
protected main:
- Open your project on GitLab or GitHub in a browser.
- Open a merge request (GitLab) or pull request (GitHub) from your issue branch into
main- both platforms show a prompt for this as soon as you push a new branch, or you can start one from the Merge requests/Pull requests section of the sidebar. - Describe the work and include
Closes #12in the request description, replacing12with your issue number. This links the request to the issue and closes it when the change is merged into the default branch. Do not close the issue just because the branch was pushed or the request was opened. - Compare the changed Markdown and diagram files with the issue's checklist. Check that the latest commit has a passing pipeline or required status checks. Respond to review comments, push revisions, and resolve discussions before merging. If your project requires approval, wait for an eligible reviewer to record it; an invitation alone is not an approval.
- Recheck that
mainstill has the expected protections, then click Merge on the merge/pull request page when it is ready. Do not bypass a failed check or try to merge locally and push directly to protectedmain. - Confirm the issue is Closed and follow the published-site checks. If the issue is still open, follow the recovery guidance there.
Once the merge reaches main, the CI/CD pipeline
rebuilds and republishes the website and PDF automatically.
Tip
Delete the branch once you've merged it - neither GitLab nor GitHub need it anymore, and it keeps your branch list tidy. Both offer a Delete branch button right after you merge a merge request or pull request.
Confirm the published website and documents
Check published outputs after the commit reaches the default
branch and the pipeline rebuilds the website and PDF.
On the merged request, confirm the linked issue is Closed. If it remains
open after the merge, check that the request targeted main and its description
used your issue number (for example, Closes #12). Close it manually only
after confirming the agreed work is on main; add a link to the merged request
so the issue retains its history.
Open the published PDF from the website's Download PDF button and check the changed pages and layout. This check is especially important if you could not build the PDF locally before committing. If the build failed, wait for a successful pipeline before trusting the published file.
The first build takes longer than you'd expect
Every build installs the whole toolchain from scratch - Node.js, Chrome, Pandoc, the Python environment - so even a routine rebuild takes several minutes, and the very first one on a fresh project can easily run into the mid-teens. A blank page or a 404 on your first visit almost always means the build simply hasn't finished yet, not that something is broken.
Check first, rather than refreshing a page that hasn't been built yet: Build > Pipelines in the sidebar on GitLab, or the Actions tab on GitHub. A running pipeline or workflow shows a spinner or a yellow dot; wait for it to turn green.
On GitLab.com, open your project and select Deploy > Pages in the sidebar. After the pipeline succeeds, open the active deployment URL shown there. This is more reliable than guessing the address, especially when the project uses a unique Pages domain.
If the site asks you to sign in, use an account allowed by the project's Pages access settings. Check those settings before sharing the URL: a private repository does not, by itself, tell you who can view its Pages site.
Working out the address yourself
With a path-based GitLab.com Pages address, a project site uses
https://<namespace>.gitlab.io/<project-name>/. A project using a
unique domain has a different address, such as
https://<project-name>-<unique-id>.gitlab.io/. Use the exact URL
shown under Deploy > Pages.
- Go to your GitHub Pages address, in the form
https://username.github.io/repository-name. This template's own site is at https://template.prodockit.org. - Unlike GitLab Pages, GitHub Pages sites are publicly accessible by default, even when the source repository is private - so no separate authorisation step is normally needed to view a GitHub Pages site once it's built.
- If your organisation has restricted Pages visibility (available on GitHub Enterprise), GitHub will ask you to sign in with an account that has access to the repository before the site loads.
What the automated build does
Both .gitlab-ci.yml and .github/workflows/docs.yml run this exact sequence automatically on every push to your default branch:
zensical build --clean --strict creates the complete site and turns
validation warnings such as broken internal links or missing anchors into
build failures. prodockit pdf then reads those generated pages and atomically
adds site_documentation.pdf to the site output, making the cover page's
Download PDF button work without another website build. See
A clean website build is needed if the
local output appears stale.
Help with common problems
Use this section to troubleshoot authoring problems encountered while working on the document.
prodockit or zensical is not recognised
prodockit : The term 'prodockit' is not recognized as the name of a cmdlet,
function, script file, or operable program.
Both commands are installed inside the virtual environment, not system-wide, so they only exist in a terminal where it is active. A new terminal window never has it - activation lasts for that window only.
The prompt gains a (.venv) prefix when it works. This bites most often after a step that told you to close and reopen your terminal to pick up a PATH change - the new window has lost the virtual environment as well.
If activating makes no difference, the virtual environment itself may be in the wrong place: .venv created somewhere other than your project folder still activates perfectly happily. pwd tells you where you are.
The virtual environment is broken
A virtual environment can become inconsistent after an interrupted install or
upgrade. Typical signs include WARNING: Ignoring invalid distribution
~ensical or WARNING: Ignoring invalid distribution ~rodockit, duplicate
*.dist-info directories, python -m pip show prodockit reporting an old
version after an upgrade, or pdk --version reporting a stale system
installation.
Do not repair individual files under .venv or site-packages. The .venv
directory contains installed packages, not your document or its source files,
so it is disposable and safer to rebuild as one unit. Start in the project
directory containing requirements.txt. If the prompt currently begins with
(.venv), run deactivate; otherwise skip that first command. If a
.venv-broken backup already exists, choose a different backup name rather
than overwriting it.
deactivate
mv .venv .venv-broken

"$(brew --prefix python@3.14)/bin/python3.14" -m venv .venv
source .venv/bin/activate

python -m pip install --upgrade pip
python -m pip install -r requirements.txt -r testrequirements.txt
python -m pip install --upgrade prodockit

rehash
command -v pdk
python -m pip show prodockit
pdk --version
rehash refreshes zsh's cached command locations. Without it, the shell
can continue to run a system pdk found before the new environment was
activated.
In PowerShell:
deactivate
mv .venv .venv-broken

python3.14 -m venv .venv
source .venv/bin/activate

python -m pip install --upgrade pip
python -m pip install -r requirements.txt -r testrequirements.txt
python -m pip install --upgrade prodockit

hash -r
command -v pdk
python -m pip show prodockit
pdk --version
hash -r is bash's equivalent of zsh's rehash: it discards cached
command locations before the checks resolve pdk again.
The command lookup should point inside the new .venv, and the two version
checks should agree. Run zensical build --clean --strict as a final check.
Delete the backup only after the rebuilt environment has passed these checks
and you are certain it contains no local file you still need:
Local preview isn't updating
If you save a change and the browser doesn't refresh, or the page looks stuck:
- Do a hard refresh in the browser first (
Ctrl+Shift+Ron Windows/Linux,Cmd+Shift+Ron macOS) - this bypasses the browser's own cache, which is a more common culprit than Zensical itself. -
If that doesn't help, stop the server (
Ctrl+Cin its terminal) and start it again: -
Still stuck? Check the terminal
zensical serveis running in - a build error there (for example, invalid TOML inzensical.toml, or a broken link) stops it rebuilding, and it'll usually tell you exactly which file and line to look at.
A cross-page reference looks stale in the live preview
zensical serve rebuilds only what it needs after a saved change. A value that
depends on a different page, such as a section or caption number, can therefore
briefly show the value from the preceding build.
Stop the preview with Ctrl+C, then make a clean build:
Open the rebuilt page again before changing a correct reference by hand. The clean whole-site build, and the equivalent automated build after a push, are the authoritative results.
A reference opens the wrong repeated heading
Zensical normally creates an id from the heading text. Two pages can therefore
both contain a heading such as ## Results, giving a cross-page reference an
ambiguous generated id.
Give each target a short, unique, explicit id and use that id in the reference:
An explicit id also keeps the reference stable if you later rename the heading. See Section cross-references for the complete syntax.
A clean website build is needed
The --clean flag on zensical build --clean --strict deletes the previous contents of public/ before rebuilding, so pages you've since renamed or removed don't linger in the published site. --strict also makes validation warnings fail the build. Both CI pipelines use both flags.
To do the same locally when the website output looks stale, run:
Numbered lists reset to "1."
If a numbered list in your Markdown restarts at "1." partway through instead of continuing (for example after a code block, admonition, or tab), it's almost always an indentation problem - Zensical (and Pandoc, for the PDF) only treat content as continuing the list item if it's indented to match. See Lists within lists for the exact rule to follow.
Mermaid or mathematics appears as source text
If a diagram appears as its Mermaid definition, or a formula appears as TeX with its backslashes and braces visible, the optional renderer has not run. The website and PDF have separate rendering paths, so one can be correct while the other is not.
- Confirm the project was installed with the Mermaid or mathematics option it actually uses.
- Run
zensical build --clean --strictand check the website. - Run
prodockit pdfand read any renderer warning printed in the terminal.
Return to your chosen installation path if the required renderer was skipped during setup.
The website and PDF do not have exactly the same layout
Some variation is normal. A browser uses a responsive screen layout, while the PDF has fixed pages, margins, headers, footers, and page breaks. Do not try to make line and page breaks identical between the two outputs.
Treat it as a problem when content is missing, overlaps, is unreadably narrow, uses the wrong font, or appears in the wrong output. Use a landscape page or adjust the content when a wide table or diagram does not fit the PDF, then check that the website remains readable too.
The word count leaves out unexpected content
The displayed word count follows the project's configured rules. It can omit
pages marked exclude_from_word_count: true, PDF-only or web-only material,
generated labels, and content produced by an extension rather than written as
ordinary Markdown text.
Check the page front matter and the word-count settings before relying on the total for a submission. When a formal limit matters, compare the reported value with the institution's own counting rules.
PDF build fails
If prodockit pdf errors out or produces a PDF missing content:
- Run
zensical build --clean --strictfirst. The PDF command requires a completed website and reports any generated page that is missing. - Check the error message in the terminal - it usually names the file and the problem directly, and anything the underlying tool printed appears beneath it.
- Make sure the website dependencies from
requirements.txtare installed in the active virtual environment. On first PDF use,prodockit pdfinstalls and validates the PDF-only packages inpdf-requirements.txt. - If the document uses Mermaid diagrams or mathematics, confirm that those options and their toolchains were installed through your chosen installation path.
- If the error says WeasyPrint cannot load a library, return to the installation guidance, including its troubleshooting link. Reinstalling the Python package alone does not install its operating-system graphics libraries.
Published site shows old content or a 404
- Check the pipeline (GitLab CI/CD > Pipelines) or workflow (GitHub Actions tab) actually ran, and succeeded, for your latest commit - if it's still running, or failed, the old version stays published.
- Confirm your change actually reached the default branch (
main) - a commit sitting on a feature branch, or a merge/pull request you haven't merged yet, never triggers a rebuild. See Review and merge the issue branch. - Hard refresh the published page (
Ctrl+Shift+R/Cmd+Shift+R) - your browser can cache the old version just as easily as it caches the local preview. - On GitHub specifically, if the workflow fails with
Get Pages site failed... Not Found, GitHub Pages hasn't been switched on for the repository yet. Go to Settings > Pages and change Build and deployment > Source from Deploy from a branch to GitHub Actions, then re-run the failed workflow. This is a one-off step after creating a repository in a new GitHub account; see Getting started for the setup route you chose. - On GitLab specifically, if the pipeline succeeds but no Pages site ever appears, check that the Pages feature itself hasn't been disabled for the project: Settings > General > Visibility, project features, permissions, and make sure Pages is toggled on. Unlike GitHub, GitLab doesn't need a separate "source" setting - Pages deploys automatically from the
pagesjob in.gitlab-ci.ymlonce the feature is enabled, which it is by default.
Where to go next
Continue to Markdown basics and Zensical basics to learn the syntax you'll actually use to write your document. Once you're comfortable writing content, come back to these later chapters when you need them:
- Document appearance and structure - branding, the cover page, PDF layout, and the document's directory structure.
- Shell commands - a reference for commands used throughout the guide.